


 |
| Pink Cascade Necklace |
 |
| made these for my Red Hat event |
 |
| the goodie bags |
 |
| another view |
 |
| hearts and candy |
 |
| "Cheese" photo real life here |
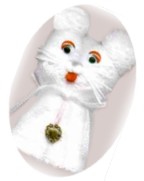
Cute Kitty Towel
What You Will Need:
Hand Towel
Novelty eyes or buttons
2 white pompoms (1/2 inch)
1 gray pompom (1/2 inch)
1 red pompom (1/2 inch)
Button or charm
Scrap ribbon pieces
Elastic Band
Hot glue
Hand Towel Kitten
Craft Project Instructions:
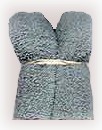
Lay the hand towel out flat and fold it lengthwise, bringing each end to
the center, but leaving about a half an inch gap at the center line. Roll
the unfolded sides to the center of the towel, as shown.
Fold your roll in half and wrap an elastic band around to hold your kitten
together (see photo below, right). Gently pull the top two ends
(one at a time) up, while pushing the center of the towel down ...
very gently or you will have to start all over again. This makes the
kitten's ears. Keep referring to the photos to help you with this process.
Wiggle the towel sections until you have a shape that looks like the
finished kitten shown above. To make kitty's nose, glue together two
white pompoms and one gray pompom. Squash them together with the
glue so you have a shape that looks like a kitten nose.
To make kitty's whiskers, use a four inch length of ribbon (larger if your towel is oversized). Cut the ribbon from each end to the center, several cuts, keeping about a half of an inch of ribbon uncut in the centre. Glue the uncut center part of the ribbon to the kitten's face (refer to photo for placement). You could also use a heavy thread instead of the ribbon for this.
To make kitty's tongue, cut a little of the fluff off of a red pompom, first
on one side of the pompom and then on the opposite side of the pompom.
You will end up with a pompom that is flat on two sides. You could also cut
a piece of felt for this, instead of using the pompom, but the pompom is
much fluffier.
Glue the nose directly on top of the whiskers that you created with ribbon
and glue your tongue just under the nose, but touching the underside of
the nose pompoms.
Glue novelty eyes or buttons for kitty's eyes, tie a bow around kitty's neck
and after you have tied the bow, remove the elastic band (the ribbon will
now hold your kitty together).
Tie a little charm around the neck ribbon. I used a plastic button and
looped a small piece of pink cord through the button and wrapped around
the neck ribbon. This is not necessary, but I prefer that kitty's ears have
a small piece of matching ribbon wrapped around them. Simply tie a
piece of ribbon around the bottom of the ears at the top of the head and
tuck the ends of the ribbon inside the center roll. This looks nicer and helps
to hold kitty, in it's original shape. This will be necessary, if children will
be playing with kitty (but remember, small children should not be given
toys with small parts).
If desired, glue a small piece of matching ribbon in place for a tail.
That's it, you're all done!
Candy Kiss Rose Bud Craft
Sherri Osborn
Great for Valentine's Day
Rose Bud Candy Kisses
Materials Needed:
- 2 Hershey's Kisses Candies
- Wooden Skewer
- Colored Cellophane (You Can Use Clear)
- Floral Tape
- Craft Foam or Silk Flower Leaves (optional)
- Cellophane Tape
- Scissors
Instructions:
Use a small piece of tape to hold the two wrapped candy Kisses together, bottom to bottom. Cut a piece of colored cellophane into a 6" square. Place the tip of one of the kisses into the center of the cellophane and then fold the cellophane up around both kisses. Twist the cellophane to secure.
Use a small piece of tape to hold the two wrapped candy Kisses together, bottom to bottom. Cut a piece of colored cellophane into a 6" square. Place the tip of one of the kisses into the center of the cellophane and then fold the cellophane up around both kisses. Twist the cellophane to secure.
Hold the wrapped kisses against the end of the wooden skewer and wrap tightly with a floral tape, winding the tape all of the way down the stick. If desired, you can cut leaf shapes out of craft foam or use leaves from silk flowers and attach them to the stem using the floral tape
.
.


No comments:
Post a Comment
Thank you for stopping by, I really enjoy comments and try to answer everyone, become a follower and never miss any future posts. Be sure to check out my Etsy shop, the link is to the side!
"Crafting and Reading and Shopping, Oh My!"